Headlight, Headlight Restoration
Headlight Restoration vs. Replacement: When Cleaning Isn’t Enough

Oct
If your headlights are cloudy, dim, or yellowed, restoring the polycarbonate lens with a DIY wet-sanding kit will clear up light surface oxidation. However, cleaning fails completely if the failure is internal: water condensation behind the lens, deep internal micro-cracking (crazing), or peeling chrome inside the reflector bowl require replacing the entire headlight assembly.
Polishing a structurally damaged housing or pairing degraded, aged bulbs with hazy lenses wastes time and money without restoring safe night visibility.
Table of Contents
Diagnostic Checklist: Can Your Headlights Be Saved?
Before spending money on a sanding kit or booking a detailer, run through these physical checks on your vehicle’s headlights to determine if the lens can be polished back to clarity or if the housing must be replaced.
1. The Fingernail & Surface Texture Test
Run your thumbnail across the hazy section of the lens.
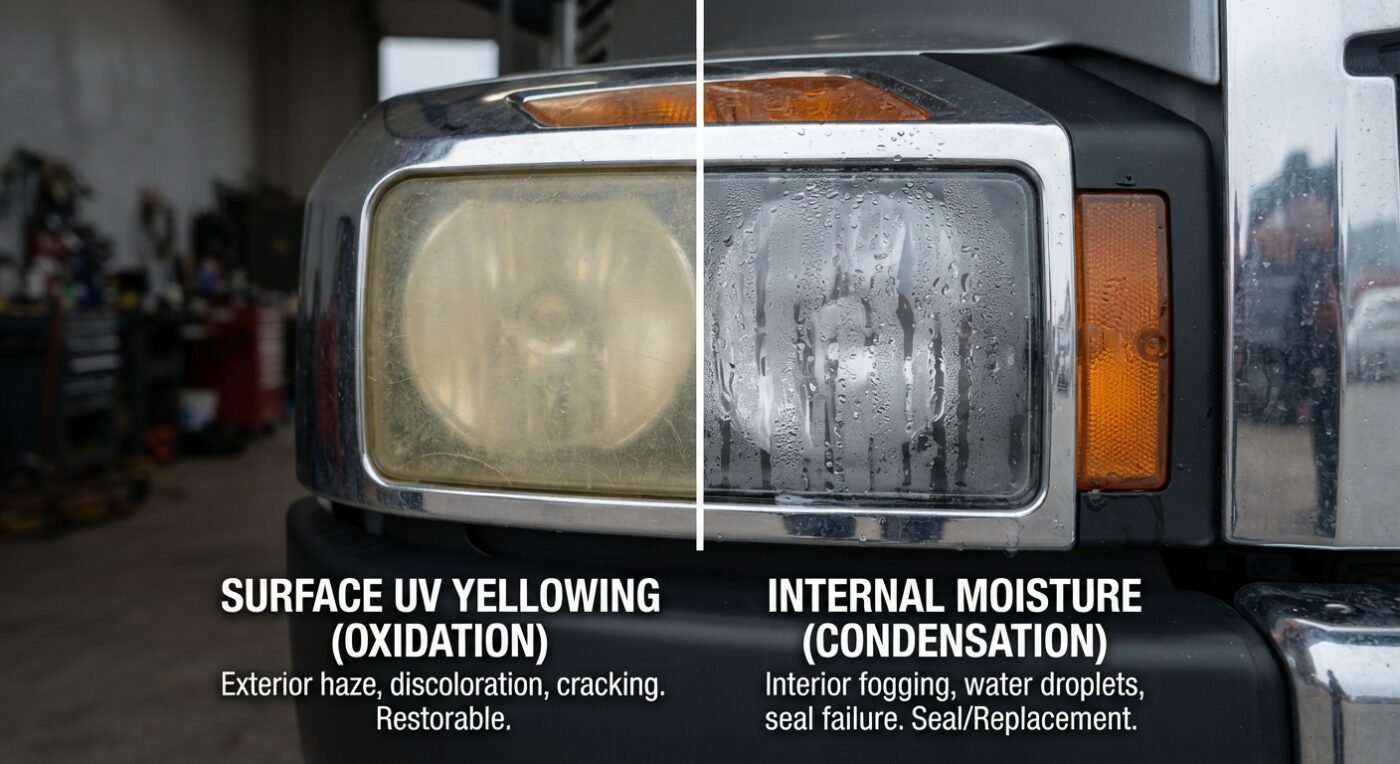
- Surface UV Oxidation: The plastic feels rough, chalky, or slightly textured. This is outer UV hard-coat degradation that can be sanded and polished smooth.
- Internal Crazing: The surface feels smooth to the touch, but looking closely under a flashlight reveals a network of fine spiderweb cracks inside the acrylic. Sanding the outside will not fix deep internal heat fractures.
2. The Internal Moisture & Condensation Check
Look inside the clear plastic housing for water droplets, fogging, or standing water at the bottom of the lens.
- Intact Seal: No moisture inside. Restoration kits will work.
- Blown Housing Seal: Droplets or pooled water indicate a failed perimeter sealant or cracked rear housing. Wet-sanding the outside leaves the inner water droplets untouched, which will corrode socket terminals and short out wiring.
3. Inner Reflector Chrome Inspection
Shine a bright flashlight through the front lens toward the back of the reflector or projector bowl.
- Reflective Chrome Intact: The inner backing is shiny and mirror-like.
- Burned / Flaking Chrome: Heat from high-wattage halogen bulbs or trapped moisture strips the mirrored chrome finish, turning it dull grey or black. Even a brand-new bulb or crystal-clear restored lens will not project light forward if the reflector backing has flaked off.
Headlight Restoration vs. Replacement Comparison
Evaluating cost, labor, and long-term durability helps determine whether to restore or replace your assemblies.
| Feature / Factor | DIY / Professional Restoration | Complete Housing Replacement |
| Primary Target | Minor surface yellowing and light hazy buildup | Severe haze, interior moisture, crazing, broken tabs |
| Typical Cost | $15–$30 (or a standard headlight restoration kit) / $75–$150 (Detailing shop) | $80.00–$253.00 per pair (Direct-fit housing set) |
| Labor Time | 1 to 2 hours of wet-sanding and polishing | 30 to 60 minutes (Unbolt old housing, plug in new set) |
| Expected Lifespan | 6 to 12 months (Re-yellows once factory coat is gone) | 5+ years (Fresh factory UV protection coating) |
| Solves Internal Damage? | No (Fails on water, crazing, or burnt reflectors) | Yes (Restores full structural seal and optical output) |
Even the best headlight restoration kit can only treat external polycarbonate yellowing. If your assemblies have broken seals, internal moisture, or cracked reflector housing tabs, no restoration product will restore full beam visibility.
Decision Rule: If your headlight lenses are smooth on the outside but show moisture or internal cracking, skip the restoration kits. Explore our catalog of Ford F-150 parts
and Ford Mustang parts for complete replacement assemblies.
The UV Coating Trap: Why Restored Headlights Turn Yellow Again
Polycarbonate headlight lenses come from the factory coated with a hard, UV-resistant clear layer. Sun exposure, road grit, and harsh car-wash detergents break down this protective film over several years, causing the bare underlying plastic to oxidize and turn yellow.
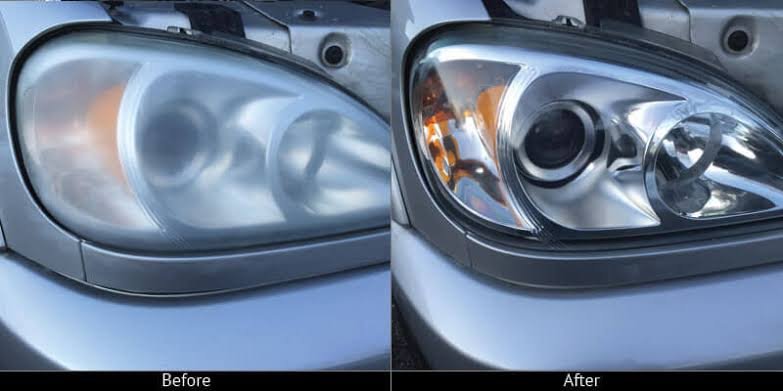
Even if you buy the best headlight restoration kit on the market – such as a drill-attached 3M headlight restoration kit – wet-sanding inherently removes the damaged outer layer along with whatever factory UV clear coat remains. While applying a polish or wipe-on sealant temporarily restores optical clarity, these consumer coatings lack the thermal baking and durability of factory-applied hard coats.
Within 6 to 12 months, the raw plastic oxidizes again under sunlight—often turning hazier than before. Repeating restoration kits every year accumulates costs in sand-paper, compounds, sealants, and labor. Installing a fresh OE-style headlight housing replacement delivers long-term clarity with a fresh, durable factory UV seal.
Replacing Housing Assemblies vs. Upgrading Bulbs: What You Actually Need
Determining whether to replace your entire housing, swap your bulbs, or perform both depends on the condition of your components.
Scenario A: Clean Housings but Weak Light Output
If your headlight lenses are clear but night driving visibility remains poor, your halogen bulbs have likely degraded. Halogen filaments lose light output over time due to age and vibration long before burning out completely.
- Halogen Solution: Upgrade to high-output bulbs like the Sylvania SilverStar Ultra H11SU-2 ($58.00) or Sylvania XtraVision 9004XV-2 ($32.00–$40.00) for increased down-road beam distance without changing factory wiring.
- LED Upgrade Solution: Convert clear reflector housings to cool-white output using a Sylvania 9005 LED 2-Pack ($100.00). Read our LED conversion kit guide to verify anti-flicker decoder compatibility before ordering.
Scenario B: Damaged or Heavily Oxidized Housings
If your truck or car housings have failed the diagnostic test above, replacing the complete assembly is necessary.
- Ford F-150 (2004–2008): Swap aged stock units for a pair of direct bolt-on Spec-D Black Euro Headlights ($80.00) using your standard H13 bulbs, or upgrade to Spec-D Black Dual Halo Projector Headlights ($253.00) featuring integrated H1 bulbs and LED halo accent rings. Learn more about optics in our breakdown of projector headlights vs reflector headlights.
- Ford Mustang (2005–2009): Refresh foggy front-end styling with OE-style projector and reflector housing sets ($180.00–$220.00 per pair) to restore full beam projection and safety.
Frequently Asked Questions
Can you replace just the clear headlight lens without buying the whole housing?
On most modern vehicles, the clear polycarbonate lens is permanently heat-sealed to the rear plastic housing with heavy-duty butyl or polyurethane adhesive. Separating the lens requires baking the entire assembly in an oven to soften the glue, which risks warping the plastic housing and ruining internal seals. Replacing the entire sealed assembly is faster, safer, and prevents future leaks.
Will installing brighter LED bulbs compensate for yellowed or hazy headlight lenses?
No. Dropping high-output LED or halogen bulbs into a foggy, yellowed housing scatters the light beam in all directions. Instead of projecting light down the road, the haze diffuses the beam, creating blinding glare for oncoming drivers while reducing your actual road visibility. Always clear or replace the lens before upgrading bulbs.
Spare Part Plug
